I keep creating, giving away, and dreaming up new art pieces for my collection.
As usual, once I commit to something it truly becomes a sort of obsession for me. I have never been the type to become invested in something, to only see it fall by the wayside soon after. If I can’t see myself sticking with a hobby, I prefer to not indulge. (If that makes much sense).
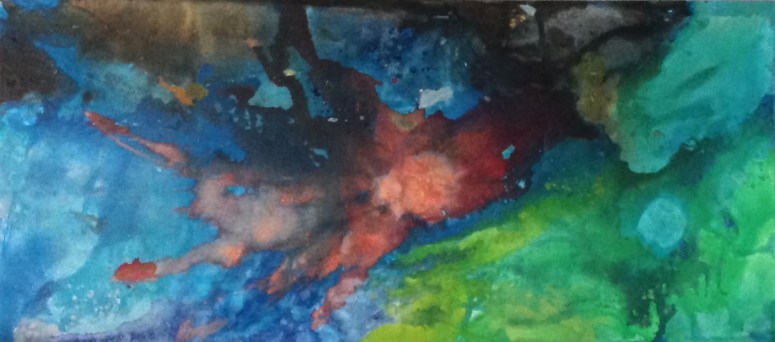
This is my latest acrylic piece. I call it “Acrylic Fire”.
I will keep experimenting with this medium as I develop my style; but I must admit that even if I do not sell another piece, my work is important to me and I hope I never stop.
When I started my Etsy shop two years ago, there were a lot of things I had to do that were totally outside of my comfort zone. One of those things (a huge and important thing) was to learn how to take good and clear photographs. When selling handmade items, one piece of advice that is repeated as gospel is to take clear images in great lighting; that tell a story about the product; and that show off as many details about texture and colour as can be in a high resolution format.
That is a geeky way of saying that you really gotta learn how to make someone buy your product all through sight! Of course there are other factors that help people decide to buy your handmade item, but that’s a topic in a blog post for another day 😉
First thing: employ the ownership of a 3 light lamp on a sturdy stand. 3 lights are best not because of aesthetic, but because they can be moved and aimed to point at your handmade object in a way that enough light hits it. Think: laser beams!
A three light lamp on a vertical stand- you can pick one of these up at Home Depot, Lowes, Home Hardware, or whatevs.
Below we see a photo stage set with a mannequin. In order to get a smooth and uniform backdrop, I hanged a white poly material from the wall. This backdrop is really best when either totally white (or as close as you can get) because the light shined from your lamp needs to be “bounced back” at the camera to ensure a well illuminated photo.
Easy trick to help remember: Optics= studying how light is captured and refracted to enhance/change images. I’m sure there is a more scholarly explanation that that of course; but that’s a basic grade 8 review 🙂
Notice the two lamps above and below – my camera is set up between the two: peeking through stand’s branches
Once the stage is set and the light hits all of the areas that you want to highlight, take a few test pictures to see whether you should use flash (or not); set a widescreen image; or fiddle around with any camera settings that you like to use.
Green Hemp apron with green frills- a feminine design by LillyBoChic
Final product: a cropped image with the brightness and contrast increased slightly.
Green Hemp apron with green frills- a feminine design by LillyBoChic
For a non-professional photograph, I think it captures all of the elements that I had hoped for. I really like how crisp and clear the photo is- you can see the blue chalk lines on the garment (a temporary marking of course) that I used to line up each pocket.